Microsoft Provide Patches for End of Support Operating.
The Post provide instructions on importing updates for Custom Support Agreements (CSA) for WSUS on Server 2012, WSUS 3 SP2, Configuration Manager 2007 and Configuration Manager 2012. This document assumes that WSUS database has been properly maintained and that Configuration Manager’s Software Update Point is already installed and syncing correctly.
Basic CSA information
There are two types of Custom Support Agreements (CSAs) for XP SP3 that will effect what you have the ability to deploy in your environment.
- Critical only updates
- Critical and Important updates
The metadata for the updates does not to distinguish between the two types of CSAs. This metadata is what lists the update in the WSUS console. It is typically delivered in a cab file format.
Access to the binary data (the payload of update files themselves) are controlled by which agreement you have. Based on your CSA, the download files available for your agreement will be on the Connect site for your login.
Importing CSA updates for WSUS on Server 2012:
*Warning – this will force a wsusutil.exe reset to get the content imported correctly.
- Download the cab file and the binaries for the updates from the Connect site. You do not need the file WSUSImportTool.exe as this functionality is now included in WSUS on Server 2012. The cab file for the updates metadata and the payload should be placed in a directory of your choosing. Most people tend to use month and year in the directory name for identification purposes.
- Open an elevated command prompt and cd to \Program Files\Update Services\Tools
- Run the following command: wsusutil.exe csaimport <Cab file location> <Payload directory> additional options are available. To see them use the command wsusutil.exe help csaimport. Note that all languages for the exe files should be downloaded and placed in a single directory with no subdirectories as the tool will not traverse the subdirectories to pull out files.
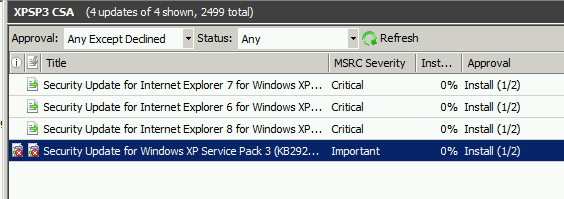
- Import of both Critical and Important updates results in a result similar to the below

Import of Critical updates only. Files will be missing. Ensure that in the missing file list, the KBs for the Critical updates are not listed. It may indicate that a file was not downloaded. The cab files were changed in July of 2014 so that Important updates are separated.

- Open the WSUS console and create a new update view for the imported updates to verify they are imported.
- To Create an Update view
- Open the WSUS Console
- Right click on Updates and select New Update View…
- Enable the property Updates are for a specific product
- When the property moves to the box labeled Step 2, click on the blue link for any product
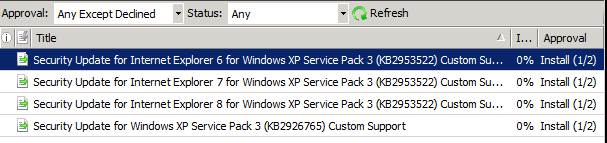
- Deselect All Products and enable just Windows XP SP3 Custom Support.
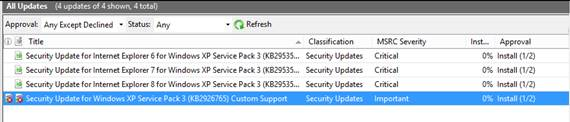
- Under Step 3 Give the view a name such as “Windows XP SP3 Custom Support”. Your updates should be listed in this view. Note that you may have to change the view to Approval = Any except Declined & Status =Any
- To Create an Update view
- Next we will add or verify the columns for MSRC Severity, MSRC Numbers and File Status are shown. Right click on the heading labeled Title and ensure that MSRC Severity, MSRC Numbers and File Status are also selected along with the Title & Approval.

- From this view, you can verify :
- Under MSRC Severity you will find out if it is labeled as Critical or Important. If your CSA is for Critical only, you will not have the payload for the important updates and will be unable to deploy them. The updates labeled Important can be declined in this situation. For a CSA with Critical and Important updates, all files will be available for download.
- Once approval is set, you can also double check that all of the files needed have been downloaded and imported. If you approve an update and it is missing files, it will show a red X in the File Status column. If you accidentally approved an update, just right click on it and select Approve and set it to Not Approved.
Missing files for update. If you had Critical only, this is normal if you accidentally approved the update.
7) Once all the files you are supposed to have are in the WSUS console, you can approve them as you would any other update.
Importing CSA updates for WSUS 3.0 SP2
*Warning – this will force a wsusutil.exe reset to get the content imported correctly.
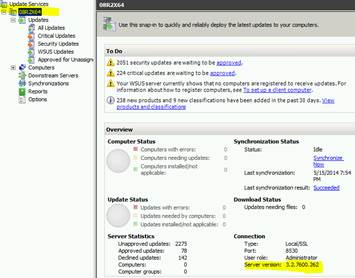
- Ensure you are running at least WSUS 3.0 SP2 with either KB2734608 or KB2828185 installed. You can verify this by looking at the version number by clicking on your server name in the WSUS console and then in the dashboard that comes up, you will see Server Version under the heading Connection. Your version should be either 3.2.7600.262 or 3.2.7600.256. If you need to install one of those KBs to get to the correct version, be aware that that version number may not increase until the WSUS server is rebooted.
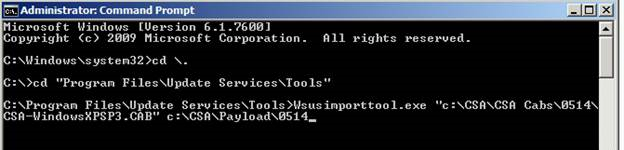
- Place a copy of WSUSImportTool.exe in a directory of your choosing. For consistency, we recommend \Program Files\Update Services\Tools. The cab file for the updates metadata and the payload should be placed in a directory of your choosing as well. Most people tend to use month and year in the directory name for identification purposes.
- Open an elevated command prompt and cd into the directory for WSUSImportTool.exe
- Run the following command: WSUSImportTool.exe <Cab file location> <Payload directory>. Additionally, you can also specify a Working directory which issued for to decompress the scan cab. By default it is %temp%. WSUSImportTool.exe <Cab file location> <Payload directory> [WorkingDir] Note that all languages for the exe files should be downloaded and placed in a single directory with no subdirectories as the tool will not traverse the subdirectories to pull out files.
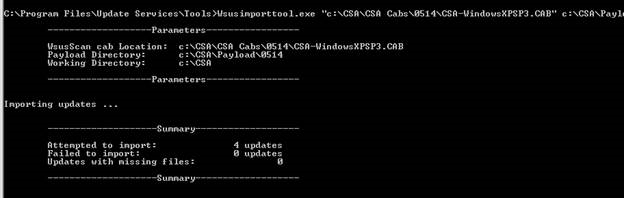
- The output will show
- The number of updates that were attempted to be imported
- The number of updates that failed to be imported
- The number of updates with missing files and a list of the missing files

Example of a successful import when on Critical updates are imported. Ensure that in the missing file list, the KBs for the Critical updates are not listed. It may indicate that a file was not downloaded. The cab files were changed in July of 2014 so that Important updates are separated.

Example of a successful import when on Critical and Important updates are imported.
- Open the WSUS console and create a new update view for the imported updates to verify they are imported.
- To Create an Update view
- Open the WSUS Console
- Right click on Updates and select New Update View…
- Enable the property Updates are for a specific product
- When the property moves to the box labeled Step 2, click on the blue link for any product
- Deselect All Products and enable just Windows XP SP3 Custom Support.
- Under Step 3 Give the view a name such as “Windows XP SP3 Custom Support”. Your updates should be listed in this view. Note that you may have to change the view to Approval = Any except Declined & Status =Any
- To Create an Update view
- Next we will add or verify the columns for MSRC Severity, MSRC Numbers and File Status are shown. Right click on the heading labeled Title and ensure that MSRC Severity, MSRC Numbers and File Status are also selected along with the Title & Approval.
- From this view, you can verify :
- Under MSRC Severity you will find out if it is labeled as Critical or Important. If your CSA is for Critical only, you will not have the payload for the important updates and will be unable to deploy them. The updates labeled Important can be declined in this situation. For a CSA with Critical and Important updates, all files will be available for download.
- Once approval is set, you can also double check that all of the files needed have been downloaded and imported. If you approve an update and it is missing files, it will show a red X in the File Status column. If you accidentally approved an update, just right click on it and select Approve and set it to Not Approved.
Missing files for update. If you had Critical only, this is normal if you accidentally approved the update.
Once all the files you are supposed to have are in the WSUS console, you can approve them as you would any other update.
Importing and deploying CSA updates into Configuration Manager 2012
This document assumes you already have a Configuration manager SUP installed and it is syncing correctly.
1) Follow the importing of the CSA updates for WSUS but DO NOT APPROVE the CSA updates. The import into WSUS should be done at the Central site if you have a ConfigMgr Hierarchy setup. Note that normally Administrators are told not to make any changes in WSUS. This is an exception to the rule. Administrators can also make the CSA Update View in the WSUS console without harming their ConfigMgr environment.
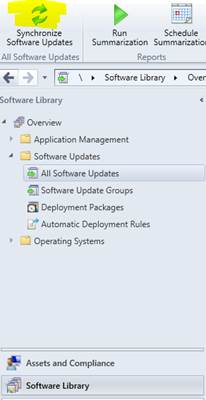
2) Once the import into WSUS is complete, force the SUP to synchronize. This initial synchronization after importing the CSA updates will add the product Windows XP SP3 Custom Support to the list of products the SUP can sync.
Synchronize the SUP ConfigMgr 2012
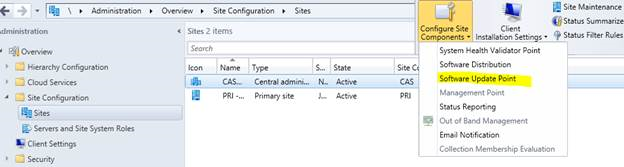
3) Now you need to configure the Software Update Point to synchronize the product Windows XP SP3 Custom Support. This will not be enabled automatically. To do this go the Administration node, expand Site Configuration, Sites, highlight the site that contains the Source/”top most” SUP. Click on Configure Site Components, Software Update Point.
ConfigMgr 2012 SUP Configuration
4) When the Software Update Point Component Properties box comes up, select the Products tab. Select the Windows XP SP3 Custom Support product for synchronization and then OK. Synchronize the SUP again to get the updates into ConfigMan.
ConfigMgr 2012 Software Update Point Component Properties- Product

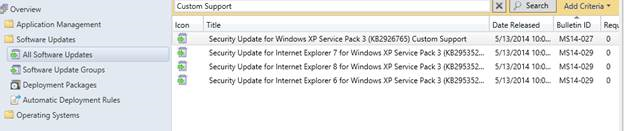
5) To view the software updates that were imported, go to the Software Library node, expand Software Updates then click on All Software Updates. In the search field type in “Custom Support” or click Add Criteria then add the Product as Windows XP SP3 Custom Support then hit Search.
ConfigMgr 2012 Filtered for Custom Support
6) Select the updates you want to deploy with either a ctrl click or a shift click. Right click on them and select Create Software Update Group (or just select deploy if that is the normal methodology you use). Give your Software Update Group a name and select Create.
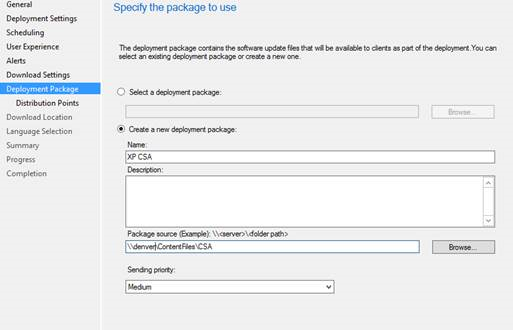
7) Go into Create Software Update Groups and select Deploy. This will bring up the Deploy Software Updates Wizard. Specify your Collection. Set your Deployment Settings, Scheduling, User Experience Alerts and Download Settings as your needs dictate. Select either a new deployment package or an existing one. Select the Distribution Points you need the package on.
ConfigMgr 2012 –Deploy Software Updates Wizard -Specify Package to Use

9) The CSA software updates will deploy like any other normal software update.